Saturday, December 1, 2012

Christmas!

I love this time of the year!


Thursday, November 8, 2012

Things are Coming Together

After almost 2 years of living here, things are finally coming together in the very first room you see when you walk in to the house. 

I'm just going to post a bunch of pictures and you'll be able to see the updates, no explanation needed. 

The room as it was when we looked at the house


Then we used all the furniture from our apartments for awhile...


Then that furniture made it's way downstairs once we got carpet down there and the living room sat empty for months and months.  Until I found these chairs and fireplace on Craigslist and got the table as a Christmas gift. 


And then once again, Craigslist pulled through and I found the perfect couch, and now we have this:


It's not quite complete, I still have some ideas/changes in mind.  But, it's getting there and that makes me happy!


Tuesday, October 16, 2012

More Stripes

The hallway needs love too!

Wednesday, August 29, 2012

He's here!

Ryker has arrived! He will actually be 3 weeks old tomorrow. But, I've been a bit busy so that is my excuse for taking so long to post :)

He was born on August 9th and weighed 8lb 9oz and was 20.5" long.

He is just perfect and we can't imagine life without him!

(photo credit goes to SuzanneJean Photography)

Sunday, July 22, 2012

Nursery Reveal

The nursery is (almost) finished!  Now we are just waiting for our little guy to arrive!

I'll let the pictures do the talking for this post...

When we first looked at the house, the room looked like this:
And then it was Dan's office for a little over a year:


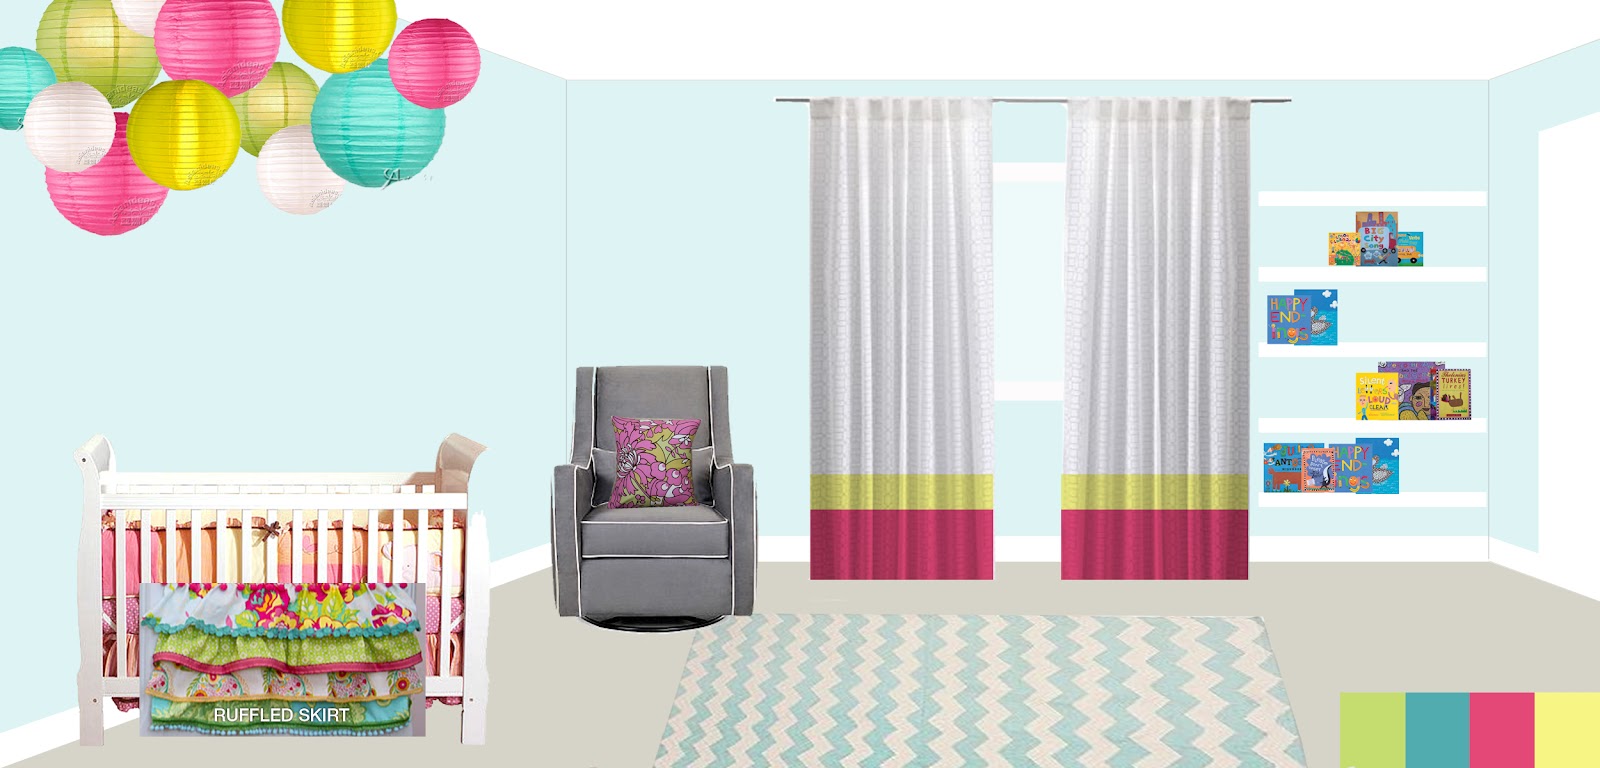
And now, it is our little guy's nursery!  Once we found out we were expecting, I started to dream up nursery plans and I had originally planned on something like this if we had a boy: 


Once it was confirmed we are having a boy, I started with the gray, aqua and orange but quickly decided I wanted to add in some navy blue too.  

Here is what we ended up with:


The dresser now has a changing pad on top of it:

A few of the details:
Using a piece of scrap wood, I created some artwork for the wall.  The steps were simple: stain wood, paint the quote and the heart and hang on the wall.  I chose this quote because Dan's mom would say this to him as a little boy (and sometimes still as a big boy).  


I created this artwork in Adobe Illustrator and framed it in an Ikea frame.  


Dan and I made these book shelves, following this tutorial.


My mom helped me make this ottoman pouf by following this tutorial, but altering the measurements to fit our needs. 


I made the mobile that hangs over the changing table/dresser.  I also made the yard wrapped H (that you can barely see) and painted the dog silhouette because I just had to include our first baby in the nursery somehow.  The top shelf has some pictures of our adorable niece and her beautiful mama!


 The biggest DIY project I tackled (with help from my brother) for the nursery was the toy box with an abacus on the front.  I will eventually do a whole post on this project. 


And here is a complete breakdown/source list:
Crib - Target
Crib skirt - sewn by my Grandmother using leftover fabric from our bedskirt and this fabric
Quilt: sewn by my Grandma (she's so talented!)
Boppy pillow cover - Etsy
Paper lanterns: Online here
ABC artwork: created by me
Floor lamp: Ikea
Side Table: Amazon
Chair: ordered from a catalog at Becker Furniture
Curtains: sewn by my Grandmother using blackout fabric and this fabric
Dresser: Dan's childhood dresser, but given a makeover
Shelves over dresser: Ikea

The only thing left to do is paint the doors white and put the closet door back on....oh ya, and have that baby so he can enjoy his new room! :)


Saturday, July 21, 2012

More Plans

They say towards the end of pregnancy that women start to nest and want to clean everything!  I'm not feeling that sort of nesting, but I am itching to finish decorating the house!  I think that is my form of nesting - decorating.  Lately, I've been dreaming up ideas left and right for changes I want to make to the house.  I'd love nothing more than to have our upstairs living/dining area finished, but it's not in the cards for awhile. 

To cure my desire to decorate, I "window" shop online instead.  Last night I came across this couch:
It's perfect for what I've been looking for - it has simple clean lines, was the correct dimensions for our living area, it's gray and I love the detail of the nail-head trim.  After calling around, it seems the couch has recently been discontinued - boooo :(

So I continued to look online for the perfect gray couch.  I've been looking online for that perfect gray couch for the past year and either I don't like the style or I fall in love with a couch that is way out of our price range. 

But, I think I came up with the perfect solution!  The Ikea Karlstad couch - a couch I've seen plenty of times out in blog land and it seems to get good reviews!  It comes looking like this:


Not too shabby in it's original form - it is gray, affordable and has the nice clean lines that I like.  But, my plan is to spice it up a bit to make it look like this:

I'd stain the legs darker and add nail-head trim and it'd look pretty similar to the first couch pictured above!


Monday, July 2, 2012

Basement Plans

With a little one on the way, we are bound to accumulate loads of toys over the next few years.  With toys comes the need for storage.  We have plenty of storage in our house, but not a lot of storage in our main living area downstairs.

Currently, the basement looks like this:


The furniture is all in the middle of a long/narrow room - so we have plenty of room at each end for play space and additional storage.

I was inspired by this post on one of my favorite blogs: Centsational Girl.  She took book shelves from Ikea and made them look like they were built right in.  With that idea in mind, I started brainstorming a way to create built-ins on one of the open walls in our basement.

I don't want all bookshelves; I want an area that is a combination of bookshelves for open storage, some drawers for closed storage and a desk. 

Here is what I came up with for the wall on the far end of the photo above:


The ends will be anchored with bookshelves, then I plan on using a media cabinet that has drawers for some closed storage.  The cabinets will also double as benches!  The bookcases and media cabinets will all come from Ikea.  Unfortunately, they didn't have a desk that'd fit the center dimensions, so I'll be building the desk from scratch.

I also have a chair I got on craigslist for $5 waiting to be reupholstered.  It'll be perfect to sit at the desk.

I have no idea when I'll get around to actually building/implementing this, but I'm excited to start - whenever that is!


Monday, June 11, 2012

DIY Nursery Mobile

Instead of opting for the traditional crib mobile that attaches to the side of the crib, I decided to hang lanterns over the crib for some visual interest.   But, I also plan on spending a lot of time using the changing table as well, so I made a mobile for the baby to look at during diaper changes.

The process was quite simple (and cheap!).  All it requires is:
- scrapbook paper (I used 2 - 12x12 sheets each of 4 different colors, so 8 sheets total)
- circle punch  (I used a 2" circle)
- fishing line
- ribbon
- double stick tape
- inside piece of a cross stitch hoop (the hoop without the adjuster)
- paint (optional)

As always, I was terrible about taking photos of each step - I really need to get better at that.  But, here is how it's done.  

Step 1 (optional):  paint the cross stitch hoop your color of choice - I painted mine white.

Step 2:  Using the circle puncher, punch out as many circles as possible from your scrapbook paper.


Step 3: Use the double stick tape to attach the circles to the fishing line.  I laid a circle down, put the fishing line over it and applied the tape in a cross over the line, then added another circle right on top of the original circle - so the circle is double sided with the fishing line sandwiched between them.  Repeat this until you have one strand of circles complete - cut the fishing line with a couple inches to spare at the end.  Make multiple strands of varying lengths.  I ended up with 12 strands of circles with anywhere from 6 - 9 circles on each strand. 

Step 4:  Once you have all of the strands of circles complete, the next step is to attach them to the hoop.  To do so, you just tie the strand around the hoop with the extra fishing line at the end of each strand.  You'll want to make sure the circles start as close to the hoop as possible.  I didn't have an exact science to this step, I just kind of guessed and eye balled it as I went to figure out the distance between each strand.  At the end, the last 2 strands were kind of close together so I just slid the other strands as needed to get an even consistent look.

Step 5:  Attach the ribbon to the top of the hoop, this will be how the mobile gets hung up.  I used 3 strands of ribbon.  2 strands were the exact same length and formed a criss-cross over the hoop.  Each end was tied to one side of the hoop. The 3rd strand of ribbon tied around the meeting point of the 2 attached strands and then was also tied to the hook in the ceiling.

And that is it!


I sure hope Baby Hall enjoys the colorful mobile and stays semi-entertained while getting his diaper changed! 


Monday, May 14, 2012

Growing

I'm growing a chunkster in there! This is 26 weeks along, though measuring a few weeks more than that.

Sunday, April 29, 2012

Another Peek

The nursery is coming right along, here is a little peek at what I've been up to lately.

Monday, April 2, 2012

Nursery Step 1: Complete

Thanks to my awesome mother-in-law and sister-in-law, our nursery is painted!

The gray is Glidden Pebble Gray and the navy accent wall is Behr Midnight Dream.

We love the way it turned out!

Wednesday, March 21, 2012

Baby Update

Today was the big day, the day we got to take a look at Baby Hall again to make sure s/he was looking healthy.  And....to find out if baby was a boy or girl.

I also had an appointment last Friday, in which Dan asked nicely if we could take a peek at the baby to see if we could tell boy or girl.  The Dr. quickly agreed, rolled in the ultrasound machine and looked over baby - which resulted in telling us she was 75% sure baby was a girl.  Awesome!  We went home, and since both of our families were in town, we shared the exciting news - we were on team pink!  All weekend long we talked about girl names and wearing pink and everything girl!

Much to our surprise, when we arrived at the appointment today, the first thing was learned was....Baby Hall is a BOY!!!!  I guess he was just being bashful on Friday, but he wasn't shy at all today. 

We laughed. For at least 5 minutes.  Funny things happen to Dan and me, so this just goes with the flow of our lives.  And we couldn't be more thrilled!  We were thrilled when we thought he was a girl and we are thrilled that we know for sure he's a boy!  Most importantly, he looks healthy and is measuring right on track!

He was really active the entire time the ultrasound tech was trying to take his measurements - he was kicking and flipping and sucking his thumb.  Then when she switched to get a good 3D picture, he curled up in a little ball and didn't want to let us get a good look at his face.  He might be a little stubborn like his mother ;) 

Today was so much fun, what a great experience to see our baby again!  I don't think we've stopped smiling yet! 

Now, on to shopping for a baby boy!!

And, since pictures are fun (or creepy, depending who you ask ;)), I suppose I'll include a couple of those as well:

Baby Boy sucking his thumb:

18 weeks pregnant (I looked like a goon, so it was necessary to crop my head off)

Thursday, February 23, 2012

Nurseries on My Mind

Dan moved his office down to the basement, which means that opens up a room for the nursery!  Once the room was empty, the wheels started turning on how I'll decorate the space. 

We still have a few weeks before we will know if we are having a boy or a girl, but that didn't stop me from creating a photoshopped nursery.  Since I don't know what sex I'll be designing for, I've created rooms for both a boy and a girl. 

For a baby boy, we'll be doing orange/aqua/gray


For a baby girl, we'll be doing aqua, pink, lime green, yellow.

I'm pretty set on the boy nursery.  I'm loving the girl nursery for now, but my mind changes a lot so who knows what I'll decide if we do end up with a girl.

Now...to wait 4 more weeks so we can put one of these plans in to action!!!