Tuesday, April 5, 2011

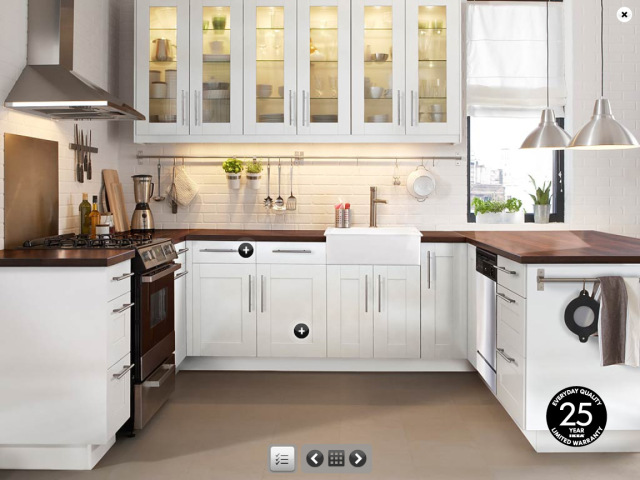
What does your dream kitchen look like?

Here is some inspiration for ours:

(I wish I could give proper photo credit, but I saved this picture awhile back and don't remember where I found it)

I love the white cupboards with the dark butcher block counters!  Someday, our kitchen will have the same feel to it....someday.....

And I stumbled across this blog post the other day, that reconfirmed how beautiful white cabinets and wood counters are:

someday.....
Until then, the small kitchen updates will have to do.  My chairs finally got their table.  When transporting the chairs and table to our house from the craigslist seller, one of the table legs broke :(  But, it is nearly fixed now! One more trip to Home Depot for a metal brace and the table will be good as new!  And the light got a little face lift as well - a coat of brushed nickle spray paint. 


Friday, April 1, 2011

Another hole?

Remember last week when I mentioned that the mini bathroom make-over all started because of the hole in the wall?  Well, that wasn't the only hole I was needing to cover up before Friday.  I also had this...


...thanks to the old school phone jack I ripped off the wall in the kitchen.  But in this instance, there wasn't time to patch the hole and paint the entire kitchen, like I did in the bathroom.  So instead, for under $10 total, I picked up this...


along with a can of this
and this


and went to town painting a couple old wooden paintings I wasn't using anymore along with the frame of that lovely floral print above.  I also covered a piece of super thick cardboard in left over fabric from the kitchen chairs.  Hung them all up on the wall, to get this:


Problem solved: the hole is covered and we have a fun little chalkboard/peg board area in our kitchen so I can jot down or hang up random notes & reminders!  


Thursday, March 31, 2011

Link Party

On occasion, people ask me how I find good blogs to read.  Usually my answer is, I find one blog that leads me to another that leads me to another.  But, here is another great way to find fun blogs - a link party!  Check it out:

Wednesday, March 30, 2011

Paint can transform anything....

....including the curtains for our master bedroom.  We desperately needed window treatments in our master bedroom, it is a large window facing the front of our house after all.  I'm sure our neighbors are sick of watching us walk around in our underwear by now ;) 


I knew I wanted something with a little interest and color on our windows, but I wasn't ready to introduce another pattern in the tune of full length curtains.  So I picked up some white cotton curtains and decided to paint them.  When trying to determine what to paint on the curtains, I remembered this blog post and loved the random sized stripes she had painted on her walls.  That was it, that was just the inspiration I needed. 

The process didn't go quite as smoothly as I had hoped.  The plan was to use the painters tape I had on hand, tape off some stripes, use a foam brush to pain the stripes and hopefully it'd take less than an hour.  Boy was I wrong - the tape didn't stick to the cotton - so 5 hours later, I had completed the hand painted, straight stripes across the bottom of each panel.  Good thing I love how they turned out!

Please excuse the poor quality cell phone picture, taken at night.  The colors aren't exactly accurate, either.  


I think I could have gone a bit wider/bolder with the stripes, but I still love them the way they are.  

The master bedroom is getting closer and closer to being complete:


- make artwork for the walls
- get lamps for the nightstands
- get large floor mirror: coming soon, hopefully I get to pick it up this week!
- paint trays on nightstands
- paint and maybe recover the chair
- paint the side table by the chair
- paint the dresser
- window coverings (2 parts)
   - curtains
   - blinds
- accessorize
- paint the trim white 


Since this post was all about paint, any suggestions on what colors to paint the chair and small side table?  

Friday, March 25, 2011

I did it!

As mentioned earlier this week - my mission (well, one of many) was to complete a mini bathroom make-over before Friday.  And, I DID IT, I was finished at 11:49 pm tonight (Thurs) to be exact!

It all started with replacing the window treatment - all I wanted to do was to remove the ugly curtain and make a roman shade.  Just that change would at least make the bathroom a tiny bit improved - I wouldn't want our guests this weekend to think I can't pick out a good window treatment ;)

But once the curtain was removed, it became apparent that the towel bar under the window was not centered and I wouldn't be able to look at that daily - it would drive me nuts!  So the towel bar was removed and created 2 holes that needed to be patched.  That lead to wanting to repaint the bathroom.  Afterall, I wouldn't want to have a house warming party with big holes in our walls **sigh**

We went from this:


(Note the reflection of the wallpapered mural on the wall above the bath, and the wall paper border surrounding the tub.  What you can't see is the 5, yes 5, wooden and ceramic towel racks on the walls)

To this:


A close-up of the simple DIY artwork - created in Illustrator, printed and framed in cheap frames that are spray painted a glossy white


The best part about the entire makeover was how cheap it was!  We already had the paint and decorations I put in there.  All I needed to purchase were new towel bars and a couple fluffy white towels. 

There is still plenty I would like to do in there (for instance, get something put up on the huge blank wall), but given the time frame I had to work with, I am happy with this mini make-over for now!

Wednesday, March 23, 2011

Sneak Peak

I have some girl friends coming to town to visit this weekend and we are also hosting a happy hour at our place on Friday night.  Knowing we were going to have a fair amount of guests checking out the house, I just had to get rid of the hideous curtains in the bathroom (they were the only window treatments we hadn't removed yet).

Changing out the curtain led to the demolition of the towel rack...which = holes in the wall.  That lead to the decision to repaint the bathroom.  One thing lead to another and now I'm on a mission to complete a mini bathroom make-over before my guests arrive on Friday.  Wish me luck, I'll need it ;)

Here is the progress so far

More to come...if you don't see the reveal by Friday, you'll know I failed my mission!

Monday, March 21, 2011

Roman Shades

 
(ignore the mess, this was taken on move-in day)

Isn't that window covering lovely?  No?  Not so much?  We didn't think so either!  So I used a popular blogland solution to give our windows the pretty treatments they deserved - I made a roman shade from a mini blind.  Here is the tutorial I followed, it was really simple and quite cheap!

I thought the biggest challenge would be finding a fabric I liked that would also match the floor in the bathroom (I don't love the floor).  In fact, when I drug Dan to JoAnns he asked what we were doing there and the conversation went like this:

D: What do you need to get here?
B: Some fabric for our bathroom window, I want to make a new curtain
D: Oh, good, I've wanted to rip that ugly curtain down since we moved in!  So, we'll be in and out, since you know what you are looking for?
B: I know what I need fabric for, I'm not so sure what I am looking for though
D: **BIG SIGH** oh.......so......it'll be awhile.....

Fortunately, we walked in and there was the fabric, staring me down, with colors that would match our floor beautifully!  We were out of there in no time, it might even be a record.  I am known to go in to the fabric store, look at all the fabric, drool over a few of them and then leave empty handed because I can't make a decision. 

Anyways, here it is, our new roman shade:


And those holes in the wall.....they'll be fixed tonight!  Since we were saying good bye to the curtain, we also decided to say good-bye to the off center, never used towel rack.